Introduction
If you’ve ever tried to figure out how to start accepting payments on your website, you’ve probably come across Stripe. And for good reason it’s one of the most trusted, developer-friendly, and beginner-accessible payment gateways available today.
But here’s the thing: even though Stripe is well-documented, actually connecting it to your website for the first time can feel overwhelming. There are API keys to find, settings to configure, test transactions to run, and live payments to activate. If you miss a step, your checkout won’t work and that means lost sales.
This guide is designed to walk you through the entire process from scratch, whether you’re a business owner, freelancer, or someone setting up their first ecommerce website. You don’t need to be a developer to follow along. Every step is explained clearly, with practical examples and troubleshooting tips along the way.
By the end of this guide, you’ll have Stripe fully connected to your website, tested, and ready to accept real payments from customers worldwide.
Let’s get started.
Table of Contents
- What Is Stripe?
- Why Businesses Choose Stripe
- Benefits of Using Stripe on Your Website
- Stripe Fees and Pricing Explained
- Countries Supported by Stripe
- Requirements Before Connecting Stripe
- Creating a Stripe Account
- Verifying Your Stripe Account
- Setting Up Business Information
- Step-by-Step Guide to Connecting Stripe to Your Website
- Testing Stripe Payments Before Going Live
- Activating Live Payments
- Setting Up Credit Card, Debit Card, Apple Pay, Google Pay, and Link by Stripe
- Configuring Payment Settings
- Managing Transactions, Refunds, Disputes, Subscriptions, and Reports
- Understanding Stripe Dashboard Features
- Security Best Practices
- SSL Certificates and PCI Compliance
- Common Stripe Errors and How to Fix Them
- Troubleshooting Guide
- Best Stripe Settings for Higher Conversion Rates
- Mobile Checkout Optimization
- Mistakes to Avoid When Connecting Stripe
- Expert Tips for Increasing Successful Payments
- Frequently Asked Questions
- Conclusion
What Is Stripe?
Stripe is an online payment processing platform that allows businesses to accept payments over the internet. Founded in 2010, it has grown to become one of the most widely used payment gateways in the world, processing hundreds of billions of dollars in transactions annually.
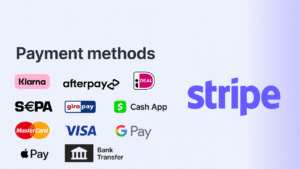
Unlike older payment systems, Stripe was built from the ground up with the modern web in mind. It supports credit card payments, debit card payments, digital wallets like Apple Pay and Google Pay, bank transfers, buy-now-pay-later options, and much more — all from a single platform.
One of the biggest reasons Stripe stands out is its flexibility. Whether you’re running a simple service-based website, a subscription business, or a full-scale ecommerce website, Stripe has the tools to match your needs. And with its clean, intuitive dashboard, even non-technical business owners can manage their payments without getting lost.

Why Businesses Choose Stripe
There’s no shortage of payment gateways out there. PayPal, Square, Authorize.Net, Braintree — the list goes on. So why do so many businesses specifically choose Stripe?
A few key reasons stand out.
Ease of integration. Stripe integrates smoothly with virtually every major website platform, ecommerce solution, and custom-built site. Most integrations take less than an hour to complete, even for beginners.
Transparent pricing. Stripe doesn’t charge monthly fees for standard accounts. You pay per transaction, which makes it easy to predict costs as your business grows.
Advanced fraud protection. Stripe’s built-in fraud detection system, Radar, uses machine learning to block suspicious transactions before they become your problem.
Global reach. Stripe supports payments in over 135 currencies, making it an excellent choice for businesses with international customers.
Developer-friendly tools. For those who want to go deeper, Stripe’s API is among the most well-documented in the industry. But you don’t need to write code to use it for standard payment setups.
Benefits of Using Stripe on Your Website
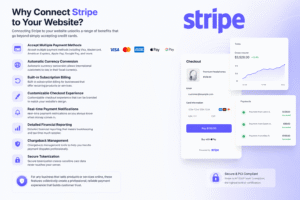
Connecting Stripe to your website unlocks a range of benefits that go beyond simply accepting credit cards.
- Accept multiple payment methods including Visa, Mastercard, American Express, Apple Pay, Google Pay, and more.
- Automatic currency conversion allows international customers to pay in their local currency.
- Built-in subscription billing for businesses that offer recurring products or services.
- Customizable checkout experience that can be branded to match your website’s design.
- Real-time payment notifications so you always know when money comes in.
- Detailed financial reporting that makes bookkeeping and tax time much simpler.
- Chargeback management tools to help you handle payment disputes professionally.
- Secure tokenization means sensitive card data never touches your server.
For any business that sells products or services online, these features collectively create a professional, reliable payment experience that builds customer trust.
Stripe Fees and Pricing Explained
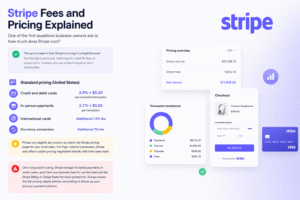
One of the first questions business owners ask is: how much does Stripe cost?
The good news is that Stripe’s pricing is straightforward. For standard accounts, there are no monthly fees or setup costs. Instead, you pay a percentage of each transaction.
Standard pricing (United States):
- Credit and debit cards: 2.9% + $0.30 per successful transaction
- In-person payments: 2.7% + $0.05 per transaction
- International cards: Additional 1.5% fee
- Currency conversion: Additional 1% fee
Prices vary slightly by country, so check the Stripe pricing page for your local rates. For high-volume businesses, Stripe also offers custom pricing negotiated directly with their sales team.
One thing worth noting: Stripe charges for failed payments in some cases, and there are separate fees for certain features like Stripe Billing or Stripe Radar for fraud protection. Always review the full pricing details before committing to Stripe as your primary payment solution.
Countries Supported by Stripe
Stripe is available in over 46 countries as of the latest updates, with ongoing expansion. Supported regions include the United States, United Kingdom, Canada, Australia, most of Europe, Singapore, Japan, Hong Kong, and many others.
Stripe also supports payments from customers in more than 195 countries, even if your business is based in one of the supported regions. This means you can sell to nearly any customer in the world, regardless of where they’re located.
If you’re unsure whether Stripe is available in your country, visit stripe.com/global for the most current list of supported regions.

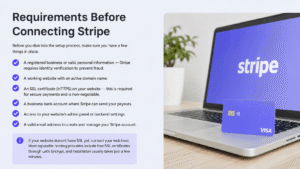
Requirements Before Connecting Stripe
Before you dive into the setup process, make sure you have a few things in place.
- A registered business or valid personal information — Stripe requires identity verification to prevent fraud.
- A working website with an active domain name.
- An SSL certificate (HTTPS) on your website — this is required for secure payments and is non-negotiable.
- A business bank account where Stripe can send your payouts.
- Access to your website’s admin panel or backend settings.
- A valid email address to create and manage your Stripe account.
If your website doesn’t have SSL yet, contact your web host. Most reputable hosting providers include free SSL certificates through Let’s Encrypt, and installation usually takes just a few minutes.
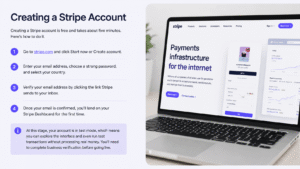
Creating a Stripe Account
Creating a Stripe account is free and takes about five minutes. Here’s how to do it.
- Go to stripe.com and click Start now or Create account.
- Enter your email address, choose a strong password, and select your country.
- Verify your email address by clicking the link Stripe sends to your inbox.
- Once your email is confirmed, you’ll land on your Stripe Dashboard for the first time.
At this stage, your account is in test mode, which means you can explore the interface and even run test transactions without processing real money. You’ll need to complete business verification before going live.
Verifying Your Stripe Account
Stripe is regulated as a financial services company, which means it’s required by law to verify the identity of its users. This process is called KYC (Know Your Customer) verification.
To complete verification:
- In your Stripe Dashboard, click on your account name at the top left.
- Select Settings, then navigate to Business settings.
- Fill in your legal business name, business type (individual, company, nonprofit), and your business address.
- Provide your Tax ID or EIN (for businesses) or Social Security Number (for individuals in the US).
- Upload a government-issued ID if prompted — Stripe may request this for additional verification.
- Enter your bank account details so Stripe knows where to send your payouts.
Verification can take anywhere from a few minutes to a couple of business days, depending on your country and the information provided. You’ll receive an email notification once it’s complete.

Setting Up Business Information
While waiting for verification, you can get ahead by completing your business profile in Stripe. This helps personalize your checkout experience and ensures customers recognize your business on their bank statements.
In the Stripe Dashboard, navigate to Settings > Business settings and fill in:
- Business name — this appears on customer receipts and bank statement descriptors.
- Support email — customers see this if they have questions about a charge.
- Support phone number — optional but helps reduce disputes.
- Statement descriptor — the short text that appears on your customer’s bank statement next to the charge amount. Keep it recognizable to avoid confusion or chargebacks.
- Business logo — uploaded here, it appears on Stripe-hosted checkout pages and receipts.
These details are small but important. A clear statement descriptor, for example, can significantly reduce the number of customers who dispute charges simply because they don’t recognize your business name on their bank statement.

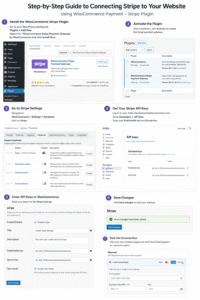
Step-by-Step Guide to Connecting Stripe to Your Website
Now we get to the core of this guide: actually connecting Stripe to your website and enabling payments.
Installing the Stripe Integration
The method for installing Stripe depends on your website platform. Most modern website builders and ecommerce platforms have a built-in Stripe payment option or an official Stripe plugin available from their plugin or app marketplace.
Log in to your website’s admin panel, navigate to the extensions, plugins, or apps section, and search for Stripe. Install the official Stripe payment gateway plugin or module. Once installed, activate it and proceed to the settings.
If you’re working with a custom-built website, Stripe’s official documentation at stripe.com/docs provides integration code for JavaScript, PHP, Python, Ruby, and most other languages.
Accessing Your Website Payment Settings
After installing the Stripe integration, you’ll typically find it under:
- Payments > Payment Methods, or
- Settings > Checkout, or
- Extensions > Payment Gateways
The exact location varies by platform, but look for anything labeled “Payments” or “Checkout” in your admin sidebar.
Click on Stripe to open its configuration settings.
Finding Stripe API Keys
API keys are how your website communicates securely with Stripe. Think of them as a private handshake between your site and Stripe’s servers.
To find your API keys:
- Log in to your Stripe Dashboard at dashboard.stripe.com.
- Click on Developers in the left sidebar.
- Select API keys.
- You’ll see two types of keys listed: Publishable key and Secret key.
Make sure you’re looking at the correct mode. Stripe shows keys for both Test mode and Live mode. The toggle for switching between modes is visible at the top right of the dashboard.
Understanding Publishable Keys
The publishable key is safe to include in your website’s front-end code. Its job is to identify your Stripe account when collecting payment information from customers.
When a customer enters their credit card details on your checkout page, the publishable key allows that information to be securely sent to Stripe’s servers not stored on your own website. This is a critical part of how Stripe keeps payment data safe.
Example publishable key format (test mode): us_test_51AbCdEfGhIjKlMnOpQrStUvWxYz...
Understanding Secret Keys
The secret key, as the name implies, must never be shared publicly. It should only exist in your website’s server-side settings, never in front-end code or publicly accessible files.
The secret key grants full access to your Stripe account including the ability to create charges, issue refunds, and access customer data. If this key is ever compromised, revoke it immediately from the Stripe Dashboard and generate a new one.
Example secret key format (test mode): sk_test_51AbCdEfGhIjKlMnOpQrStUvWxYz...
Connecting API Keys to Your Website
With your API keys in hand, return to your website’s Stripe payment settings.
- Locate the fields labeled Publishable Key and Secret Key.
- Copy your Publishable Key from the Stripe Dashboard and paste it into the publishable key field on your website.
- Copy your Secret Key and paste it into the secret key field.
- Double-check that you’ve pasted the correct keys — test mode keys start with
us_test_andsk_test_, while live mode keys start withus_live_andsk_live_.
During your initial setup, use test mode keys. This lets you run transactions without charging real cards.
Saving and Verifying Settings
Click Save or Save Changes on your website’s Stripe settings page.
Once saved, your website should confirm that it’s connected to Stripe. Some integrations display a green checkmark or a “Connected” status message. If you see an error, double-check that you haven’t accidentally included any extra spaces when pasting your API keys.
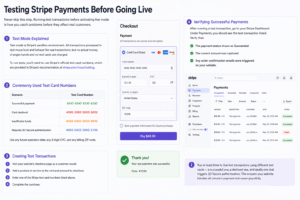
Testing Stripe Payments Before Going Live
Never skip this step. Running test transactions before activating live mode is how you catch problems before they affect real customers.
Test Mode Explained
Test mode is Stripe’s sandbox environment. All transactions processed in test mode look and behave like real transactions, but no actual money changes hands and no real cards are charged.
To run tests, you’ll need to use Stripe’s official test card numbers, which are provided in Stripe’s documentation at stripe.com/docs/testing.
Commonly used test card numbers:
- Successful payment: 4242 4242 4242 4242
- Card declined: 4000 0000 0000 0002
- Insufficient funds: 4000 0000 0000 9995
- Requires 3D Secure authentication: 4000 0025 0000 3155
Use any future expiration date, any 3-digit CVC, and any billing ZIP code.
Creating Test Transactions
- Visit your website’s checkout page as a customer would.
- Add a product or service to the cart and proceed to checkout.
- Enter one of the Stripe test card numbers listed above.
- Complete the purchase.
Verifying Successful Payments
After running a test transaction, go to your Stripe Dashboard. Under Payments, you should see the test transaction listed. Verify that:
- The payment status shows as Succeeded.
- The correct amount was captured.
- Any order confirmation emails were triggered on your website.
Run at least three to five test transactions using different test cards — a successful one, a declined one, and ideally one that triggers 3D Secure authentication. This ensures your website handles all common payment outcomes gracefully.
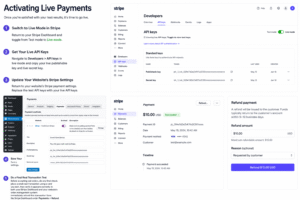
Activating Live Payments
Once you’re satisfied with your test results, it’s time to go live.
- Return to your Stripe Dashboard and toggle from Test mode to Live mode.
- Navigate to Developers > API keys in live mode and copy your live publishable key and live secret key.
- Return to your website’s Stripe payment settings.
- Replace the test API keys with your live API keys.
- Save your settings.
Before accepting real orders, do one final check: place a small real transaction using a card you own, then verify it appears correctly in both your Stripe Dashboard and your website’s order management system. Immediately refund this transaction from the Stripe Dashboard under Payments > Refund.
Setting Up Credit Card Payments
Credit card payments are enabled by default once your Stripe integration is active. Stripe accepts Visa, Mastercard, American Express, Discover, Diners Club, and JCB cards in most countries.
In your website payment settings, confirm that credit card payments are toggled on. Most integrations label this as Card payments or Credit/Debit cards. No additional configuration is typically needed for standard card acceptance.
Setting Up Debit Card Payments
Debit cards with a Visa or Mastercard logo are processed through the same infrastructure as credit cards in Stripe. Your website’s payment checkout system will accept them automatically alongside credit cards. No separate configuration is needed.
For bank debit methods like ACH (US) or SEPA Direct Debit (Europe), you’ll need to enable these separately in your Stripe Dashboard under Settings > Payment methods.
Setting Up Apple Pay
Apple Pay allows customers using iPhones, iPads, and Macs to pay with Face ID or Touch ID, eliminating the need to type card details.
To enable Apple Pay:
- In your Stripe Dashboard, go to Settings > Payment methods.
- Find Apple Pay and click Enable.
- Stripe requires you to verify your domain with Apple. This is done by downloading a verification file from Stripe and uploading it to a specific location on your website (
.well-known/apple-developer-merchantid-domain-association). - Many website platforms handle this automatically through their Stripe integration — check your payment gateway settings for an “Enable Apple Pay” toggle.
Once enabled, Apple Pay appears automatically at checkout for eligible users on supported Apple devices.
Setting Up Google Pay
Google Pay works similarly to Apple Pay but for Android users and Chrome browser on any device.
- In your Stripe Dashboard, navigate to Settings > Payment methods.
- Find Google Pay and click Enable.
- Unlike Apple Pay, Google Pay doesn’t require domain verification — it enables automatically for Stripe users who qualify.
Google Pay appears at checkout for customers using Chrome or Android devices when their browser detects a saved payment method in their Google account.
Setting Up Link by Stripe
Link is Stripe’s own one-click checkout feature. It allows customers to save their payment details once and use them instantly across any website that uses Stripe — without re-entering card information.
Link is especially valuable for repeat customers and can significantly reduce checkout abandonment. To enable it:
- In your Stripe Dashboard, go to Settings > Payment methods.
- Enable Link.
- In your website’s Stripe payment settings, confirm Link is enabled under checkout options.
Customers will be prompted to save their payment details after their first purchase, and future checkouts become one-click experiences.
Configuring Payment Settings
Beyond payment methods, several other settings are worth configuring for a smoother checkout experience.
Capture method: By default, Stripe authorizes and captures payment simultaneously. For physical goods where fulfillment may take time, consider enabling manual capture so you authorize at checkout but only charge when the order ships.
Statement descriptor: Set a recognizable business name to reduce chargebacks from confused customers.
Receipt emails: Enable Stripe to send automatic receipt emails to customers after each successful transaction.
Tax collection: If your business is required to collect sales tax, enable Stripe Tax or integrate a tax calculation plugin.
Webhooks: Configure webhooks in your Stripe Dashboard under Developers > Webhooks to allow Stripe to send real-time notifications to your website about payment events (successful payments, refunds, disputes). Your website platform may configure these automatically during the Stripe integration process.
Managing Transactions
Your Stripe Dashboard is the central hub for all transaction management. Under Payments, you can:
- View a complete list of all transactions with their status (succeeded, pending, failed, refunded).
- Click on any payment to see full details including customer information, card type, and any metadata from your website.
- Export transaction data to CSV for accounting purposes.
- Search and filter payments by date, amount, customer, or payment method.
For website owners, your website’s order management section mirrors this data. Most integrations sync automatically, so a completed Stripe payment triggers an order status update on your website.
Managing Refunds
Issuing a refund in Stripe takes about 30 seconds.
- In your Stripe Dashboard, go to Payments.
- Find the transaction you want to refund and click on it.
- Click Refund payment.
- Choose whether to issue a full refund or a partial refund (enter the specific amount).
- Select a refund reason (optional) and click Refund.
Refunds typically return to the customer’s original payment method within 5–10 business days, depending on their bank. Stripe does not return the processing fee for refunded transactions.
Managing Disputes and Chargebacks
A dispute (also called a chargeback) occurs when a customer contacts their bank to reverse a charge. Stripe notifies you via email and in the Dashboard when a dispute is filed.
To respond to a dispute:
- Go to Payments > Disputes in your Stripe Dashboard.
- Click on the dispute and review the reason given by the customer’s bank.
- Gather evidence — order confirmations, shipping tracking numbers, customer communications, receipts, or any proof the transaction was legitimate.
- Submit your evidence through the Dashboard before the deadline shown.
Stripe passes your evidence to the card network for review. The outcome depends entirely on the evidence provided and the card network’s decision. The process typically takes 60–120 days.
Prevention is always better than response. Clear statement descriptors, transparent refund policies, and responsive customer support are the most effective ways to minimize disputes.
Downloading Payment Reports
For accounting and tax purposes, Stripe allows you to export payment data in multiple formats.
- In your Stripe Dashboard, navigate to Reports.
- Select the report type you need — Balance, Payouts, Disputes, or custom reports.
- Set your date range.
- Click Export to download a CSV file compatible with most accounting software.
Stripe also integrates directly with accounting tools like QuickBooks and Xero through third-party apps, allowing automatic synchronization of your financial data.
Understanding Stripe Dashboard Features
Your Stripe Dashboard is more than just a place to view payments. Here’s a quick overview of its key sections:
- Home — An at-a-glance summary of recent payments, net volume, and payouts.
- Payments — Full transaction history with search and filter capabilities.
- Customers — A database of everyone who has ever paid through your Stripe account.
- Products — Manage your products, prices, and subscription plans.
- Reports — Financial reports and data exports.
- Payouts — View your payout schedule and bank account details.
- Radar — Fraud detection rules and blocked payment reports.
- Developers — API keys, webhooks, logs, and event history.
- Settings — Account configuration, payment methods, email receipts, and more.
Spending 20–30 minutes exploring the Dashboard when you first set up your account will save you hours of confusion later.
Security Best Practices
Connecting a payment gateway brings with it the responsibility of protecting your customers’ financial data. Here are the most important security practices every website owner should follow.
- Never store raw card data on your server. Stripe handles all sensitive data — your job is to make sure you’re using Stripe’s tools correctly.
- Rotate your API keys if you ever suspect they’ve been compromised.
- Restrict API key permissions where possible — use restricted keys for integrations that only need specific capabilities.
- Enable two-factor authentication (2FA) on your Stripe account.
- Keep your website platform and plugins updated to protect against known security vulnerabilities.
- Monitor your Stripe Dashboard regularly for unusual transaction patterns.
- Use Stripe Radar to add custom fraud rules if you start seeing suspicious activity.
SSL Certificates and Website Security
HTTPS is not optional when accepting online payments — it’s a baseline requirement.
An SSL certificate encrypts the connection between your customer’s browser and your web server. Without it, data passed through your website (including anything entered at checkout) could be intercepted.
Most hosting providers now include free SSL certificates. To verify your site has SSL:
- Look for the padlock icon in your browser’s address bar.
- Your website address should begin with
https://nothttp://.
If your site doesn’t have SSL, contact your hosting provider or use a free certificate from Let’s Encrypt (letsencrypt.org).
PCI Compliance Explained for Beginners
PCI DSS (Payment Card Industry Data Security Standard) is a set of security requirements that all businesses accepting card payments must follow.
The good news: using Stripe significantly reduces your PCI compliance burden. Because Stripe handles all card data through its own secure servers, you’re classified as a SAQ A merchant — the simplest compliance level.
To maintain compliance:
- Always use Stripe’s official checkout tools (Stripe.js, Stripe Elements, or Stripe Checkout).
- Never collect or store card numbers, CVCs, or expiration dates directly on your website.
- Keep your website software updated.
- Ensure your website is served over HTTPS.
You can learn more about PCI compliance at pcisecuritystandards.org.
Common Stripe Errors and How to Fix Them
API Key Errors
Error: “No such API key” or “Invalid API key provided.”
Fix: Double-check that you’ve copied the full API key without any extra spaces or truncation. Confirm you’re using the correct key type for your current mode (test keys for test mode, live keys for live mode).
Payment Failures
Error: “Your card was declined.”
Fix: This is a customer-side issue in most cases. Advise the customer to contact their bank, try a different card, or use an alternative payment method. If many customers are experiencing declines, check your Stripe Radar settings for overly aggressive fraud rules.
Checkout Errors
Error: Checkout page not loading or throwing a JavaScript error.
Fix: Check your browser’s developer console for error messages. Common causes include a missing or incorrect publishable key, a conflict with another plugin, or a theme JavaScript error.
Authentication Errors
Error: “Authentication required” or 3D Secure challenge not completing.
Fix: Ensure your integration supports 3D Secure. Most modern Stripe integrations handle this automatically, but older or custom setups may need to be updated.
Webhook Errors
Error: Webhooks not triggering or returning 400/500 errors.
Fix: In your Stripe Dashboard under Developers > Webhooks, check the event logs for failed attempts. Ensure the webhook URL on your website is publicly accessible and that your website is correctly handling the incoming POST requests.
Currency Issues
Error: “Currency not supported” or incorrect currency being charged.
Fix: Check your website’s currency settings and confirm the currency is supported by Stripe in your region. Visit stripe.com/docs/currencies for the full list of supported currencies.
Country Restriction Issues
Error: “Country not supported” for certain payment methods.
Fix: Some payment methods (like SEPA Direct Debit or iDEAL) are only available in specific regions. Enable only the payment methods relevant to your target market in your Stripe Dashboard under Settings > Payment methods.
Troubleshooting Guide
If something isn’t working after following all the setup steps, work through this checklist:
- Check API keys — Are they pasted correctly with no extra spaces? Are you using the right keys for the current mode (test vs. live)?
- Check SSL — Is your website running on HTTPS?
- Clear cache — Clear your browser cache and your website’s cache, then retry.
- Deactivate other plugins temporarily — A conflicting plugin can break checkout.
- Review Stripe Dashboard logs — Under Developers > Logs, Stripe records every API call. Error messages here are precise and helpful.
- Check webhook configuration — Ensure your webhook URL is correct and returning a 200 response.
- Test in an incognito browser window — This rules out browser extension conflicts.
- Review your hosting server logs — Some payment errors originate at the server level.
If you’ve exhausted these steps and still can’t resolve the issue, Stripe’s support team (support.stripe.com) is highly responsive and knowledgeable. For website-specific issues, reach out to your platform’s support team or a professional developer.
Best Stripe Settings for Higher Conversion Rates
A properly configured payment gateway doesn’t just process payments — it actively improves the percentage of visitors who complete a purchase.
- Enable as many payment methods as possible. Offering Apple Pay and Google Pay can reduce checkout time to under five seconds for eligible customers.
- Use Stripe’s Smart Retries for subscriptions to automatically retry failed payments at the optimal time.
- Enable Link to give returning customers a one-click checkout experience.
- Configure a clear statement descriptor to reduce confusion and chargebacks.
- Minimize required fields at checkout. Every extra field is an opportunity for a customer to abandon the process.
- Enable automatic receipt emails — they reduce customer confusion and support inquiries.
- Set up Stripe Radar rules to block known fraudulent patterns without blocking legitimate customers.
Mobile Checkout Optimization
More than half of online purchases now happen on mobile devices. If your checkout isn’t optimized for mobile, you’re losing sales.
- Ensure your checkout page is fully responsive — test it on both Android and iOS devices.
- Enable Apple Pay and Google Pay — these replace the card entry form entirely for eligible mobile users.
- Keep the checkout form minimal — name, email, card details, and nothing unnecessary.
- Use large, tappable buttons that are easy to press on small screens.
- Confirm that your payment confirmation page loads correctly on mobile browsers.
- Test your entire checkout flow on at least two or three different devices before going live.
Improving Customer Checkout Experience
The checkout experience directly affects your conversion rate. Here are some practical improvements:
- Show trust signals near the payment area — an SSL badge, accepted card logos, and a money-back guarantee statement all reduce hesitation.
- Display a clear order summary so customers can review their purchase before paying.
- Keep checkout pages fast — slow-loading pages are a significant cause of cart abandonment.
- Offer a guest checkout option — forcing account creation before purchasing is one of the most common checkout abandonment triggers.
- Provide clear error messages when payment fails so customers know exactly what to do next.
- Send confirmation emails promptly — customers feel reassured when they receive instant confirmation.
Mistakes to Avoid When Connecting Stripe
Even with a great guide, there are pitfalls that trip up many first-time Stripe users.
- Going live with test API keys — this is more common than you’d think. Always double-check you’ve replaced test keys with live keys before accepting real orders.
- Skipping test transactions — you won’t know what happens when a card is declined until you test it. Find out before your customers do.
- Using an unverified account — trying to process live payments before completing account verification will result in funds being held or the account being restricted.
- Not setting up webhooks — without webhooks, your website may not receive payment confirmation events properly.
- Ignoring mobile testing — if you only test checkout on a desktop, you’ll miss mobile-specific issues.
- Forgetting the SSL certificate — Stripe will not allow card payments on non-HTTPS pages.
- Not configuring the statement descriptor — leaving it blank or using confusing text leads to unnecessary chargebacks.
Expert Tips for Increasing Successful Payments
After helping numerous businesses set up and optimize their online payment systems, here are some of the most impactful practical tips.
Use Stripe Checkout for simpler sites. Stripe’s hosted checkout page is pre-optimized, PCI compliant, and converts well. It removes the need to design and maintain your own checkout form.
Monitor your payment success rate. In your Stripe Dashboard, track the percentage of payment attempts that succeed. Industry average is around 85–90%. If yours is significantly lower, investigate with Stripe’s Radar and review your decline messages.
Respond to disputes within 24 hours. The sooner you submit evidence for a chargeback, the better your chances of winning. Set up email alerts so you never miss a dispute notification.
Use Stripe’s customer portal for subscriptions. It allows subscribers to update their payment method themselves, reducing involuntary churn from outdated card information.
Consider Stripe Billing for subscription businesses. It includes dunning management — automated emails to customers with expiring or failed cards — which alone can recover a meaningful percentage of failed subscription renewals.
Frequently Asked Questions About Stripe Website Integration
1. Is Stripe free to use? Stripe has no monthly fees for standard accounts. You pay 2.9% + $0.30 per successful card transaction in the US. Pricing varies by country.
2. How long does it take to set up Stripe? Most website payment integrations can be completed in under an hour. Account verification may take up to 1–2 business days.
3. Do I need a developer to connect Stripe to my website? Not for most popular website platforms. Stripe offers official plugins and integrations that are designed for non-technical users. Custom or headless websites may require developer assistance.
4. Can I use Stripe if I’m a freelancer or sole trader? Yes. Stripe supports individuals, freelancers, sole traders, and businesses of all sizes. You’ll complete identity verification during setup.
5. How does Stripe send money to my bank account? Stripe pays out to your connected bank account on a rolling basis — typically every 2–7 days depending on your country. In the US, standard payouts take 2 business days. You can configure your payout schedule in the Dashboard.
6. What currencies does Stripe support? Stripe supports over 135 currencies. Customers can pay in their local currency, and Stripe converts it to your settlement currency at competitive exchange rates.
7. Is Stripe safe for my customers? Yes. Stripe is PCI DSS Level 1 certified — the highest level of payment security certification. All card data is encrypted and handled by Stripe’s servers, never your website.
8. Can I accept recurring payments with Stripe? Yes. Stripe’s subscription and billing features allow you to set up weekly, monthly, annual, or custom billing cycles for recurring charges.
9. What happens if a payment fails? For one-time payments, Stripe returns an error code explaining the reason for failure. For subscriptions, Stripe’s Smart Retries feature automatically attempts to re-collect failed payments at optimal times.
10. Can I use Stripe in multiple countries? If your Stripe account is registered in a supported country, you can accept payments from customers in nearly any country worldwide, in over 135 currencies.
11. Does Stripe offer a payment form I can embed on my website? Yes. Stripe Elements allows you to embed customizable, secure payment fields directly into your own checkout page. Stripe Checkout is a hosted option that requires no coding.
12. How do I refund a customer in Stripe? Go to Payments in your Stripe Dashboard, find the transaction, and click Refund. You can issue full or partial refunds. Processing takes 5–10 business days.
13. What is a webhook in Stripe and do I need one? A webhook is a URL on your website that Stripe sends real-time event notifications to. For most website integrations, webhooks are automatically configured. They ensure your website knows when payments succeed, fail, or are refunded.
14. Can I use Stripe alongside other payment gateways? Yes. Many websites offer multiple payment options — Stripe for card payments plus PayPal, for example. Customers appreciate having choices.
15. How do I handle international VAT or sales tax with Stripe? Stripe Tax (available as an add-on) automates tax calculation for supported countries. You can also integrate third-party tax plugins depending on your website platform.
16. What is Stripe Radar and do I need it? Stripe Radar is the built-in fraud prevention system included with every Stripe account. Basic Radar is free. Radar for Fraud Teams, which includes advanced custom rules, has an additional per-transaction cost.
17. Can I use Stripe on a mobile app? Yes. Stripe provides SDKs for iOS and Android for accepting payments in native mobile apps. This is separate from website checkout integration.
18. What should I do if Stripe holds my funds? Stripe may place a hold on funds when additional verification is needed, usually during account setup or for unusual transaction patterns. Check your email for any verification requests from Stripe and complete them promptly. Contact Stripe support if you’re unsure why funds are being held.
19. Can I offer buy-now-pay-later with Stripe? Yes. Stripe supports buy-now-pay-later options including Klarna and Afterpay in supported countries. Enable these under Settings > Payment methods in your Stripe Dashboard.
20. What is the difference between Stripe Checkout and Stripe Elements? Stripe Checkout is a fully hosted, pre-built payment page that Stripe manages. Stripe Elements is a set of customizable UI components you embed into your own webpage. Checkout is simpler to implement; Elements gives you more design control.
Conclusion
Connecting Stripe to your website is one of the most valuable investments you can make in your online business. Done correctly, it gives you access to a world-class payment processing platform that handles security, fraud prevention, and global payment acceptance — so you can focus on running your business.
To recap the complete process: start by creating and verifying your Stripe account, setting up your business information, and installing the Stripe integration on your website. Retrieve your test API keys from the Stripe Dashboard, paste them into your website’s payment settings, and run thorough test transactions before switching to live keys. Enable the payment methods most relevant to your customers, configure your statement descriptor and checkout settings, and familiarize yourself with the Stripe Dashboard for ongoing transaction management.
Before you accept your first real payment, do one final review: confirm your site runs on HTTPS, your live API keys are in place, webhooks are configured, and your payment methods are enabled. Test the checkout flow on both desktop and mobile. Make sure your statement descriptor is clear and your receipt emails are working.
Getting these details right from the beginning saves enormous headaches down the road. A well-configured Stripe integration doesn’t just process payments — it builds customer confidence, reduces disputes, and helps your business grow sustainably.
Need Professional Website Design or Payment Gateway Setup?
At 5sixDigital, we help businesses create professional websites and integrate secure payment solutions for customers worldwide.
Website: https://5sixdigital.com
Email: info@5sixdigital.com
Whether you need a new website, Stripe integration, payment gateway setup, or help growing your online business, our team is ready to assist.
Contact us today to get started.