How to Connect Stripe to WooCommerce: A No-Fluff Guide for Store Owners (2026)
I’ve set up Stripe on WooCommerce more times than I can count. Somewhere around the twentieth install, you stop following guides and just know where things break.
But I still remember the first time. I sat there staring at the API keys screen, convinced I was about to mess something up and accidentally charge someone 10,000insteadof10. Spoiler: I didn’t. The setup is actually straightforward once you know which parts matter and which parts you can skip.
That’s what this guide is. The stuff that actually matters. No endless screenshots of buttons you can already see. No chapters about the history of online payments. Just the steps, the gotchas, and the things I wish someone had told me before I started.
We’ll cover the full setup, what fees actually look like, how to test without stress, and — most importantly — what to do when something goes wrong. Because something always goes wrong.
Let’s get into it.
Why Stripe? (The Short Version)
You’ve probably already decided on Stripe. But just in case you’re still weighing options, here’s what actually matters:
It doesn’t feel like a third-party thing. Customers stay on your site. They don’t get punted to some external payment page that looks sketchy and kills your conversion rate. The checkout feels native.
The fees are what they are. 2.9% + 0.30pertransactionintheUS.1.40.30 in Australia. International cards cost extra. Currency conversion costs extra. No monthly fees, no setup fees. You pay when you get paid.
It handles the stuff you don’t want to think about. PCI compliance, fraud detection, chargeback disputes, recurring billing if you need it. Stripe’s machine learning (they call it Radar) catches most fraud before it hits you.
It works with basically everything. Credit cards, debit cards, Apple Pay, Google Pay, Klarna, Afterpay, iDEAL, SEPA — the list is long. If your customer has a way to pay, Stripe probably supports it.
Now, the setup.
Before You Start: What You Actually Need
You need four things before any of this works:
-
A WordPress site with WooCommerce installed and active. If you don’t have this yet, go do that first. Not sure how to manage your site once it’s running? We’ve put together a straightforward guide on how to edit, update, and maintain your website that covers the essentials without the technical overwhelm.
-
An SSL certificate. Your site needs to load over HTTPS, not HTTP. Stripe won’t work without it. Most hosting providers include a free SSL via Let’s Encrypt. If yours doesn’t, fix that before anything else.
-
A Stripe account. Go to stripe.com and create one. It’s free. You’ll need to verify your email, provide some business details, and connect a bank account where Stripe will send your money. Want a detailed walkthrough with country-specific steps for the US, UK, and Australia? We’ve got a complete Stripe account setup guide here. Do this now — it only takes a few minutes.
-
The official WooCommerce Stripe Payment Gateway plugin. Not some third-party alternative. Not a “Stripe” plugin from a developer you’ve never heard of. The official one, developed by WooCommerce themselves. It’s free, it’s maintained, and it’s the one that actually gets security updates on time.
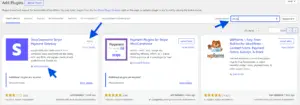
Step 1: Install the Stripe Plugin
From your WordPress dashboard:
-
Go to Plugins → Add New.
-
Search for “WooCommerce Stripe Gateway”.
-
Find the plugin by WooCommerce (not some other developer).
-
Click Install Now, then Activate.
That’s it. The plugin is active. Now we connect it to your Stripe account.
Step 2: Connect Your Stripe Account
Here’s where things changed in 2025. Stripe and WooCommerce moved away from the old method of copying and pasting API keys manually. The new connection uses OAuth — a secure, one-click authorization that doesn’t expose your keys.
If you’re reading an older guide that tells you to go find your Publishable Key and Secret Key and paste them into fields, that guide is outdated. The current method is simpler and more secure.
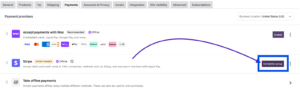
From your WordPress dashboard:
-
Go to WooCommerce → Settings → Payments.
-
Find Stripe in the list of payment methods.
-
Toggle it on, then click Manage (or Finish setup if this is your first time).
-
Click the “Create or connect an account” button.
You’ll be redirected to Stripe’s website. Log in with your Stripe credentials (or create a new account if you haven’t already — and if you need help with that, our Stripe account guide walks you through it). Stripe will ask you to authorize WooCommerce to connect. Click through the prompts.
When it’s done, you’ll be redirected back to your WordPress dashboard. The connection is live.
Important: If you see an option to “Re-use this business to create a new account,” that means your Stripe account is already connected to another platform. You’ll need to disconnect it from the old integration first — go to your Stripe dashboard, find Apps in the sidebar, and remove the old connection. Then come back and try again.
Step 3: Configure Your Payment Settings
Back in WooCommerce, you’ll now see the Stripe settings page. It’s broken into a few sections. Here’s what actually matters:
Payment Methods
This is where you choose which payment types to accept. At minimum, enable:
-
Credit/debit cards (Visa, Mastercard, Amex, Discover)
-
Apple Pay / Google Pay (under Express checkouts)
Everything else — Klarna, Afterpay, iDEAL, SEPA — is optional. Enable what your customers actually use. If you sell primarily to European customers, turn on SEPA and iDEAL. If you sell higher-ticket items, consider enabling Buy Now Pay Later options.
General Settings
-
Enable Stripe: Obviously leave this on.
-
Enable test mode: Turn this on for now. We’ll test before going live.
-
Enable Optimized Checkout Suite: This is new. It uses machine learning to decide the order in which payment methods are displayed to each customer. It’s designed to show the method most likely to convert for that specific shopper. I’d recommend turning it on — early data suggests it improves conversion rates.
Payments & Transactions
-
Enable saved payment methods: Turn this on. It lets returning customers save their card details for faster checkout. It’s a small thing that meaningfully reduces friction for repeat buyers.
-
Statement descriptor: This is what appears on your customers’ bank statements. Make it recognizable. If your store is called “Green Leaf Tea,” don’t set it to “GLT Holdings LLC.” Use something customers will actually recognize. Confusing descriptors are a leading cause of chargebacks.
-
Capture type: Leave this on automatic capture unless you have a specific reason to manually authorize and capture later (like you don’t charge until you ship physical products).
Advanced Settings
-
Debug mode: Turn this on during setup. It logs errors so you can troubleshoot if something goes wrong. Turn it off once everything is working — it adds unnecessary logging overhead on a live store.
Click Save changes at the bottom of the page.
Step 4: Set Up Webhooks
Good news: since version 8.6.1 of the Stripe plugin, webhooks are configured automatically when you connect your account. You probably don’t need to touch them.
But you should verify they’re working.
-
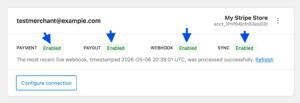
Go to WooCommerce → Settings → Payments → Stripe → Settings.
-
In the Account details section, click the Configure connection button.
-
In the popup, check both the Live and Test tabs. The webhook status should say “Configured.”
If it doesn’t, click the Reconfigure webhooks button in each tab. This will automatically create the correct endpoints in your Stripe dashboard and remove any old ones.
That’s it. Don’t manually create webhook endpoints unless you have a very specific reason. The automatic setup handles it.
Step 5: Test Your Setup
Testing is not optional. I’ve seen too many store owners skip this, go live, and then panic when payments fail silently.
Stripe has a test mode that lets you simulate payments without moving real money. Here’s how to use it properly:
-
Make sure Test mode is enabled in your Stripe settings.
-
Go to your store’s front end. Add a product to your cart. Proceed to checkout.
-
When you get to the payment step, use this test card number:
4242 4242 4242 4242
Use any future expiration date (like 12/28), any three-digit CVC (like 123), and any zip code (like 12345).
-
Complete the order.
If everything is working, the order will go through, and you’ll see it in your WooCommerce Orders page. You’ll also see the test payment in your Stripe dashboard (make sure you’ve toggled Test Mode on in the Stripe dashboard to see test data).
Here are a few other test scenarios worth running:
| Scenario | Card Number |
|---|---|
| Successful payment | 4242 4242 4242 4242 |
| Declined payment | 4000 0000 0000 0002 |
| 3D Secure required | 4000 0027 6000 3184 |
Testing a declined payment is actually important — it lets you see what the error messaging looks like for your customers. Make sure it’s clear and helpful, not alarming.
Once you’re satisfied everything works, disable Test Mode in your Stripe settings. You’re now processing live payments.
What Fees Actually Look Like
I mentioned the percentages earlier, but abstract numbers don’t really hit until you see them applied.
Here’s a practical example. Say your WooCommerce store processes $10,000 in sales in a month, all from domestic US card payments.
At 2.9% + 0.30pertransaction,andassuminganaverageordervalueof50 (so roughly 200 transactions), your fees would be:
-
2.9% of 10,000=290
-
0.30×200transactions=60
-
Total: $350 in fees for the month
That’s about 3.5% of your revenue going to payment processing. It’s not nothing. But it’s also not hidden — you know exactly what you’re paying.
If you sell internationally, factor in an extra 1.5% on international cards and 1% on currency conversions. Those add up faster than you’d think.
Common Problems (and How to Actually Fix Them)
Stripe Doesn’t Appear at Checkout
Why this happens: Usually one of three things. Either Stripe isn’t actually enabled in your payment settings, your site doesn’t have a valid SSL certificate, or your theme is conflicting with the payment form.
How to fix it: First, double-check that Stripe is toggled on under WooCommerce → Settings → Payments. Second, verify your SSL certificate is valid — you can do this by checking that your site loads with the padlock icon in the browser address bar. Third, temporarily switch to a default WordPress theme (like Twenty Twenty-Four) and see if Stripe appears. If it does, your theme is the culprit.
Payments Go Through in Stripe But Orders Don’t Update in WooCommerce
Why this happens: Almost always a webhook issue. Stripe and WooCommerce aren’t communicating correctly.
How to fix it: Go to WooCommerce → Settings → Payments → Stripe → Settings → Account details → Configure connection. Click Reconfigure webhooks in both the Live and Test tabs. This clears out old webhooks and creates fresh ones. Wait a few minutes, then place a test order to verify it’s working.
“An Issue Occurred Generating a Connection to Stripe”
Why this happens: Your site might not be reachable from the internet (if you’re developing locally), you might not have HTTPS enabled, or WooCommerce’s servers might be temporarily down.
How to fix it: If you’re on localhost, this won’t work. Stripe needs to reach your site from the internet. If you’re on a live site with HTTPS, wait a few minutes and try again. If it still fails, contact WooCommerce support — this particular error usually requires their intervention.
My Stripe Account Was Suspended
Why this happens: This is the one nobody talks about, but it happens more than you’d think. Stripe can suspend accounts for a variety of reasons — too many chargebacks, selling products in a restricted category, or triggering their automated risk detection.
How to fix it: Contact Stripe support directly. WooCommerce support can’t help with Stripe account issues. Have your account ID ready (you can find it in the footer of any email from Stripe). Be prepared to provide documentation about your business — invoices, proof of fulfillment, business registration documents.
How to prevent it: Keep your chargeback rate low. Respond to disputes promptly. Make sure your website clearly states what you sell and includes a refund policy. Don’t sell anything in Stripe’s restricted categories. And for the love of everything, make sure your statement descriptor is something customers will actually recognize.
A Few Things Worth Doing After Setup
Once Stripe is running smoothly, here are a few things that will save you headaches later:
-
Enable Stripe Radar. It’s Stripe’s fraud detection tool. The basic version is free and included. It uses machine learning to flag suspicious transactions before they turn into chargebacks.
-
Turn on auto-updates for the Stripe plugin. Security patches happen. You want them applied immediately, not when you remember to check three months later. If you’re not comfortable managing plugin updates yourself, take a look at our guide on how to edit, update, and maintain your website — it’ll show you exactly what to do without accidentally breaking anything.
-
Check your Stripe dashboard weekly. Not obsessively. Just enough to catch anything unusual — a spike in failed payments, an unexpected decline pattern, a chargeback you didn’t notice.
-
Keep your WordPress site, theme, and all plugins updated. The most common Stripe conflicts I see are from outdated themes or plugins that haven’t kept pace with WooCommerce updates.
Frequently Asked Questions
Can I use Stripe without a business license?
Yes, for most countries. Stripe allows individuals and sole proprietors to create accounts. You’ll still need to provide identification and, in some regions, tax information. If you’re still in the process of setting up your Stripe account and want step-by-step help, we’ve published a complete Stripe account setup guide covering the US, UK, and Australia.
How long does it take for Stripe to send payouts?
In the US, payouts follow a 2-day rolling schedule. In the UK and Australia, it’s typically 7 days. Your first payout may take a few extra days while Stripe verifies your account.
Do I need a website to use Stripe with WooCommerce?
Yes. Stripe requires a live website that clearly describes what you sell. A “coming soon” page won’t pass verification. Your site needs to show products, pricing, and basic business information. While you’re setting up your online presence, it’s also worth considering a branded email address — something like hello@yourstore.com instead of yourstore@gmail.com. It builds trust, keeps your messages out of spam folders, and makes your business look established from day one. We’ve covered this in detail in our guide on the 10 benefits of a professional email address.
Can I use both Stripe and PayPal in my WooCommerce store?
Absolutely. Most stores offer both. They work independently — you can enable Stripe and PayPal simultaneously, and customers choose at checkout.
What happens if a customer files a chargeback?
Stripe will notify you through your dashboard. They’ll withdraw the disputed amount from your account plus a chargeback fee (15intheUS,£15intheUK,A25 in Australia). You’ll have the opportunity to submit evidence — tracking numbers, delivery confirmations, correspondence with the customer. If you win the dispute, the money is returned. If you lose, the chargeback stands.
What if I see a “Re-authenticate” notice in my Stripe settings?
This is part of Stripe’s mid-2025 security update. WooCommerce is moving all connections to OAuth, which is more secure than the old API key method. Click the Re-authenticate button and follow the prompts. It takes about thirty seconds and significantly improves your account security.
The Bottom Line
Connecting Stripe to WooCommerce isn’t complicated. The official plugin handles most of the heavy lifting. The connection process takes maybe ten minutes. Testing adds another ten.
The part that trips people up isn’t the setup. It’s the stuff that happens after — the chargebacks, the webhook failures, the unexpected account suspensions. Those things are rare. But knowing what to do when they happen is what separates a store that bounces back from one that panics.
Get the setup right. Test thoroughly. Keep everything updated. Check your dashboard occasionally. And if something goes wrong, Stripe’s support is actually decent — use it.
Now go connect your store. That’s enough reading.