Introduction
Setting up an online store is one thing. Making sure your customers can actually pay you — easily, securely, and using the method they prefer — is something else entirely.
WooCommerce is the world’s most popular ecommerce platform, powering more than 28% of all online stores globally. One of its greatest strengths is flexibility: it supports virtually every major payment gateway available, from Stripe and PayPal to Buy Now Pay Later solutions like Klarna and Afterpay.
But with so many options available, it can be genuinely overwhelming to figure out which payment methods to enable, how to install them, and how to configure everything correctly so your checkout actually works the way it should.
That’s exactly what this guide is for.
Whether you’re setting up your first online store or adding new payment options to an existing one, this guide walks you through every major payment method available for WooCommerce — step by step, with plain language and practical examples throughout. No advanced technical knowledge required.
By the end, your WooCommerce store will be equipped to accept payments from customers around the world, using whatever method they trust most.
Let’s get started.
Table of Contents
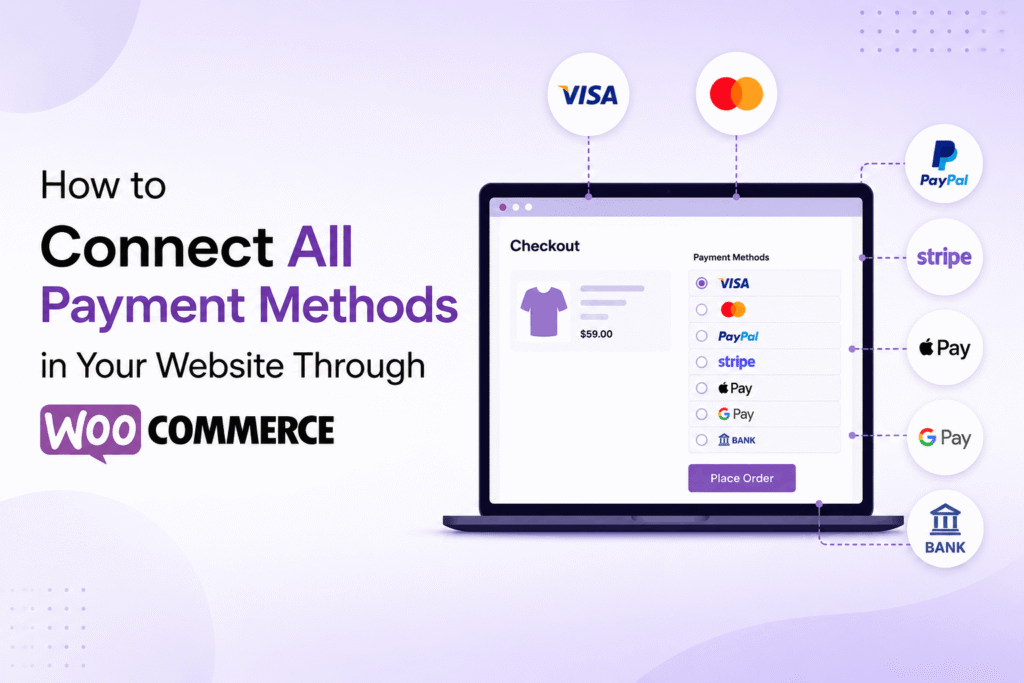
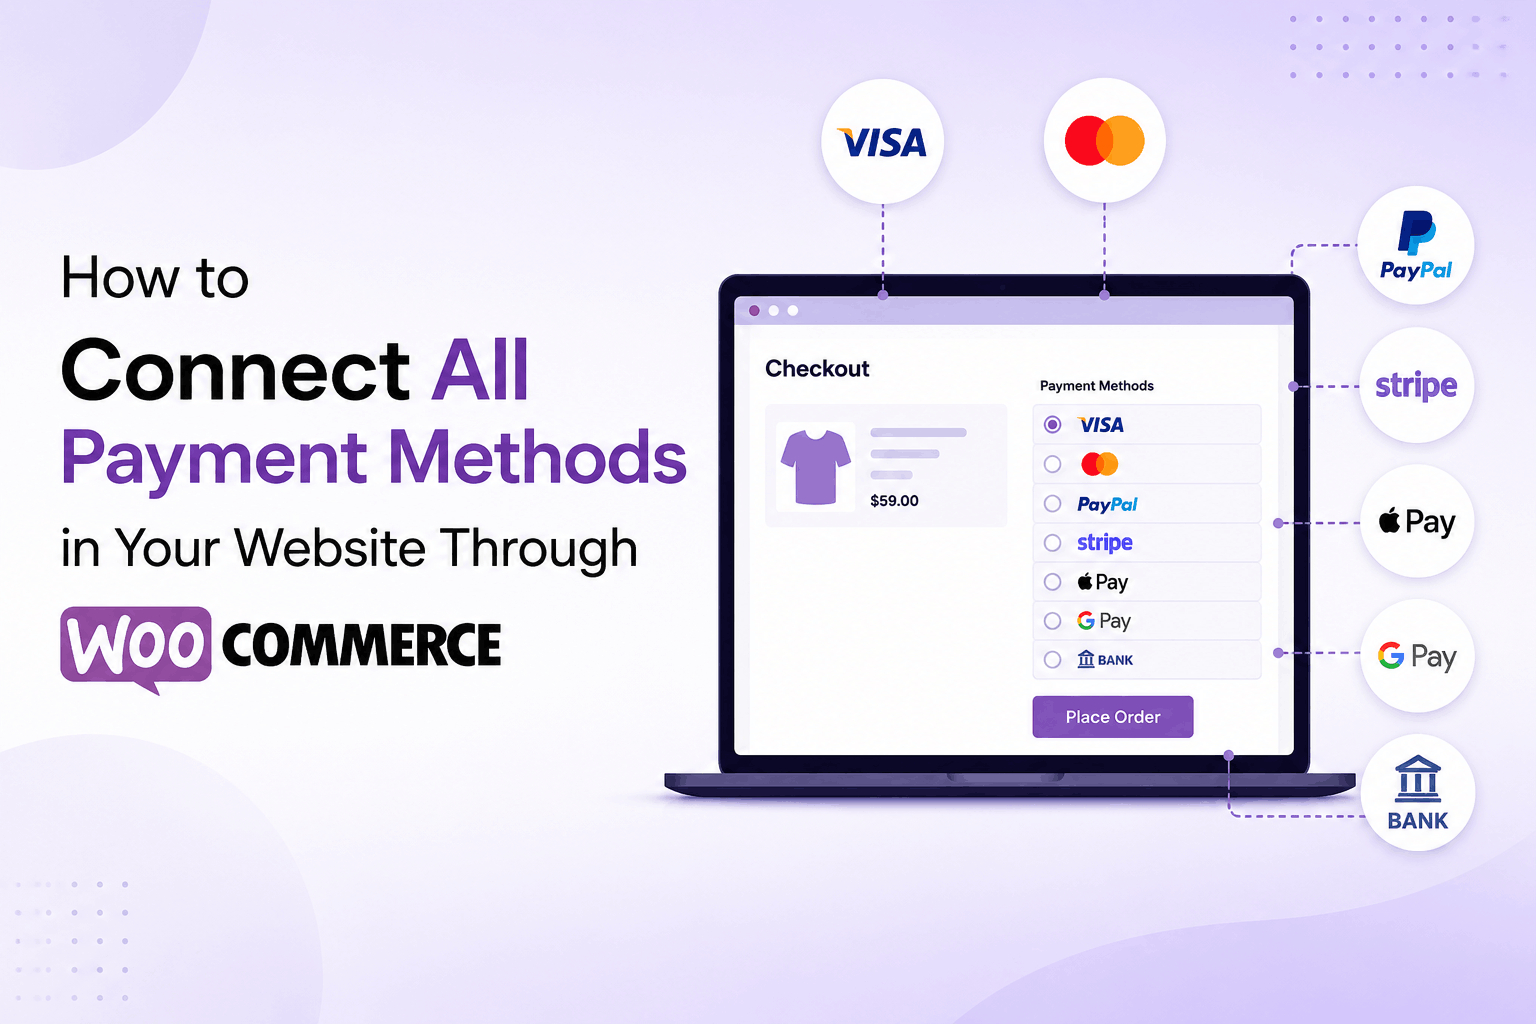
- What Is WooCommerce and How Do Payments Work?
- Why Offering Multiple Payment Methods Matters
- Requirements Before Setting Up Payment Methods
- Navigating WooCommerce Payment Settings
- How to Connect Stripe to WooCommerce
- How to Connect PayPal to WooCommerce
- How to Connect Square to WooCommerce
- How to Connect Authorize.Net to WooCommerce
- How to Connect Klarna (Buy Now Pay Later) to WooCommerce
- How to Connect Afterpay / Clearpay to WooCommerce
- How to Enable Apple Pay in WooCommerce
- How to Enable Google Pay in WooCommerce
- How to Set Up Direct Bank Transfer (BACS) in WooCommerce
- How to Set Up Cheque Payments in WooCommerce
- How to Set Up Cash on Delivery in WooCommerce
- How to Accept Cryptocurrency Payments in WooCommerce
- How to Connect Razorpay to WooCommerce
- How to Connect Mollie to WooCommerce
- How to Connect Worldpay to WooCommerce
- How to Connect 2Checkout / Verifone to WooCommerce
- Configuring the Order of Payment Methods at Checkout
- Testing All Payment Methods Before Going Live
- SSL Certificates and PCI Compliance for WooCommerce
- Payment Security Best Practices for WooCommerce
- Common WooCommerce Payment Errors and How to Fix Them
- Troubleshooting Guide for WooCommerce Payments
- Best Payment Method Combinations for Different Store Types
- How the Right Payment Methods Increase Conversions
- Accepting International Payments in WooCommerce
- Managing Refunds Across Payment Gateways
- Managing Disputes and Chargebacks
- Mistakes to Avoid When Setting Up WooCommerce Payments
- Frequently Asked Questions
- Conclusion
What Is WooCommerce and How Do Payments Work?
WooCommerce is a free, open-source ecommerce plugin for WordPress. It transforms any WordPress website into a fully functional online store — complete with product pages, a shopping cart, checkout, order management, and payment processing.
Unlike hosted platforms such as Shopify or BigCommerce, WooCommerce gives you complete control over your store. That includes choosing exactly which payment gateways you want to offer, how they’re displayed at checkout, and how transactions are handled.
Payments in WooCommerce work through payment gateways — integrations that connect your store to a payment processor. Each gateway is typically installed as a WordPress plugin. Once installed and configured, the gateway appears as an option at your checkout page, allowing customers to pay using that method.
WooCommerce comes with a few built-in payment options (bank transfer, cheque, and cash on delivery) but for any real payment processing — credit cards, digital wallets, PayPal, and so on — you’ll need to install additional gateway plugins.
The good news is that WooCommerce has an enormous ecosystem of payment plugins, both free and premium, covering virtually every payment method used worldwide.
Why Offering Multiple Payment Methods Matters
One of the most common reasons customers abandon checkout is that their preferred payment method isn’t available. Research consistently shows that offering a broader range of payment options directly increases conversion rates and average order value.
Consider your customers’ different preferences:
- Some customers trust PayPal and won’t enter their card details on an unfamiliar site.
- Others exclusively use Apple Pay or Google Pay because it’s faster on mobile.
- Younger shoppers often prefer Buy Now Pay Later options like Klarna or Afterpay.
- International customers may rely on regional payment methods not available through standard card processors.
- Some B2B customers want to pay via bank transfer.
When you offer multiple well-chosen payment methods, you remove friction from the buying process and make it easier for every type of customer to complete their purchase. The result is fewer abandoned carts and more revenue.
Requirements Before Setting Up Payment Methods
Before installing any payment gateway on your WooCommerce store, make sure the following foundations are in place.
- WordPress and WooCommerce installed and active — Your store needs to be running before adding payment plugins.
- An SSL certificate (HTTPS) — All reputable payment gateways require your site to run on HTTPS. This encrypts data between your customer’s browser and your server. Most hosting providers offer free SSL through Let’s Encrypt.
- A registered business and bank account — Most payment processors require identity verification and a bank account to receive payouts.
- WooCommerce configured with your store currency — Go to WooCommerce > Settings > General and set your currency before activating any payment gateway.
- A verified email address — Required for account creation with most payment providers.
- Tax and shipping settings configured — These don’t block payment setup, but they must be correct before you start accepting real orders.
With these in place, you’re ready to start adding payment methods.
Navigating WooCommerce Payment Settings
All payment gateways in WooCommerce are managed from one central location.
In your WordPress admin panel, navigate to WooCommerce > Settings > Payments.
Here you’ll see a list of all installed payment gateways. For each one you can:
- Toggle it on or off using the Enable/Disable switch.
- Click Manage or Set up to open its configuration screen.
- Drag and drop the rows to change the order in which payment methods appear at checkout.
The payment methods displayed at the top of this list appear first at your checkout page. It’s worth thinking carefully about which method you want most prominently displayed — usually your primary gateway like Stripe or PayPal.
Every payment gateway you install will add itself to this list after activation. You’ll always come back to this screen to manage your payment options.
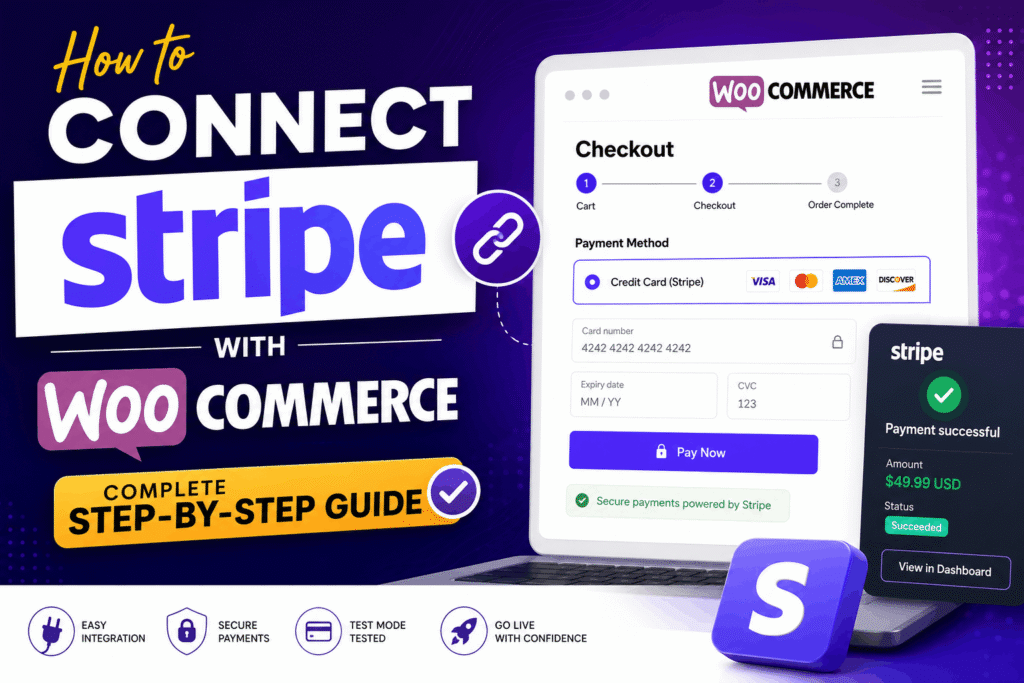
How to Connect Stripe to WooCommerce
Stripe is the most popular payment gateway for WooCommerce stores. It supports credit cards, debit cards, Apple Pay, Google Pay, Link, and more — all from a single plugin.
Step 1: Install the Stripe Plugin
- In your WordPress admin, go to Plugins > Add New.
- Search for “WooCommerce Stripe Payment Gateway”.
- Click Install Now, then Activate.
Step 2: Connect Your Stripe Account
- Go to WooCommerce > Settings > Payments.
- Click Set up or Manage next to Stripe.
- Click Connect with Stripe. You’ll be redirected to Stripe’s website.
- Log in to your existing Stripe account or create a new one.
- Authorize the connection and you’ll be redirected back to your WooCommerce settings with your account connected.
Step 3: Configure Stripe Settings
Once connected, configure the following in the Stripe settings panel:
- Enable/Disable — Toggle Stripe on.
- Title — This is what customers see at checkout (e.g., “Credit / Debit Card”).
- Description — Optional text shown under the payment option at checkout.
- Payment Request Buttons — Enable this to show Apple Pay and Google Pay buttons at checkout.
- Saved Cards — Allows returning customers to save their card for faster future checkout.
- Test Mode — Enable this during setup and testing. Disable when ready to go live.
Step 4: Test and Go Live
With Test Mode on, use Stripe’s official test card numbers (available at stripe.com/docs/testing) to run test transactions. Confirm payments appear in your Stripe Dashboard under Test mode. When satisfied, toggle Test Mode off to start accepting real payments.
How to Connect PayPal to WooCommerce
PayPal remains one of the most trusted payment methods globally. WooCommerce supports two main PayPal integrations: PayPal Standard (legacy) and PayPal Payments (the modern recommended option via the official WooCommerce PayPal plugin).
Step 1: Install WooCommerce PayPal Payments
- Go to Plugins > Add New.
- Search for “WooCommerce PayPal Payments” (the official plugin by WooCommerce).
- Install and activate it.
Step 2: Connect Your PayPal Account
- Go to WooCommerce > Settings > Payments.
- Find PayPal and click Set up.
- Click Connect to PayPal.
- Log in with your PayPal Business account credentials or create a new one.
- Grant the requested permissions and complete the onboarding process.
- You’ll be redirected back to WooCommerce with the connection confirmed.
Step 3: Configure PayPal Settings
- Standard Payments — Redirects customers to PayPal’s website to complete payment, then back to your store.
- Advanced Credit and Debit Cards — Allows customers to enter card details directly on your checkout page (requires PayPal account approval).
- PayPal Pay Later — Enables Buy Now Pay Later options through PayPal, including Pay in 4 and Pay Monthly in supported countries.
- Smart Payment Buttons — Displays contextual PayPal buttons including PayPal, Venmo (US), and Pay Later options at checkout and on product pages.
Step 4: Enable Sandbox Testing
PayPal provides a Sandbox environment for testing. In the PayPal plugin settings, enable Sandbox mode and enter your PayPal Sandbox credentials from the PayPal Developer Dashboard (developer.paypal.com) to run test transactions without real money.
How to Connect Square to WooCommerce
Square is an excellent choice for businesses that sell both online and in person, since it synchronizes inventory and payments across both channels.
Step 1: Install the Square Plugin
- Go to Plugins > Add New and search for “WooCommerce Square”.
- Install and activate the official plugin.
Step 2: Connect Your Square Account
- Navigate to WooCommerce > Settings > Payments > Square.
- Click Connect with Square.
- Sign in with your Square account (or create one at squareup.com).
- Authorize the connection and select the Square location you want to link to your WooCommerce store.
Step 3: Configure Square Settings
- Payment Method Title — What customers see at checkout.
- Transaction Type — Choose between Charge (immediate capture) or Authorization (capture later).
- Saved Cards — Allow customers to save their card for faster future checkout.
- Sync Inventory — Enable this if you want WooCommerce and Square to share product inventory counts in real time.
Step 4: Test with Square Sandbox
Enable sandbox mode in the plugin settings and use Square’s test card numbers (available in Square’s developer documentation) to verify transactions before going live.
How to Connect Authorize.Net to WooCommerce
Authorize.Net is one of the oldest and most trusted payment gateways, particularly popular with US-based businesses and B2B merchants.
Step 1: Create an Authorize.Net Account
If you don’t have one, sign up at authorize.net. You’ll need a merchant account, which Authorize.Net can help you set up or you can use your existing bank’s merchant account.
Step 2: Install the Plugin
- Go to Plugins > Add New and search for “Authorize.Net for WooCommerce”. There are both free and premium options available.
- Install and activate your chosen plugin.
Step 3: Enter Your API Credentials
- Log in to your Authorize.Net account and navigate to Account > Settings > API Credentials and Keys.
- Copy your API Login ID and generate a Transaction Key.
- In WooCommerce, go to WooCommerce > Settings > Payments > Authorize.Net and paste these credentials into the corresponding fields.
Step 4: Configure and Test
- Enable Test Mode and use Authorize.Net’s sandbox environment (sandbox.authorize.net) to run test transactions.
- Configure your accepted card types, saved card options, and transaction type (authorize only vs. authorize and capture).
- When testing is complete, switch to live mode and enter your live API credentials.
How to Connect Klarna (Buy Now Pay Later) to WooCommerce
Klarna is one of the world’s leading Buy Now Pay Later (BNPL) providers. It allows customers to split purchases into interest-free installments or pay in 30 days, which can significantly increase average order values — particularly for higher-priced products.
Step 1: Apply for a Klarna Merchant Account
Visit business.klarna.com and apply for a merchant account. Klarna reviews applications, which can take a few business days. You’ll need to provide business details, expected monthly sales volume, and your website URL.
Step 2: Install the Klarna Plugin
- Once approved, Klarna will provide you with an API key.
- Go to Plugins > Add New and search for “Klarna Payments for WooCommerce” or “Klarna Checkout for WooCommerce”.
- Install and activate the plugin.
Step 3: Enter Klarna Credentials
- Go to WooCommerce > Settings > Payments and click Manage next to Klarna.
- Enter your Merchant ID and API Key provided by Klarna.
- Select your purchase country — Klarna’s available payment options vary by region.
Step 4: Enable Klarna’s On-Site Messaging (Optional but Recommended)
Klarna offers a free On-Site Messaging widget that displays promotional messaging on your product pages (e.g., “Split into 3 interest-free payments with Klarna”). This is proven to increase conversions and average order values. Enable it through the Klarna On-Site Messaging plugin available from the WordPress plugin directory.
How to Connect Afterpay / Clearpay to WooCommerce
Afterpay (known as Clearpay in the UK and parts of Europe) is another leading Buy Now Pay Later solution, allowing customers to split purchases into four interest-free fortnightly payments.
Step 1: Apply for an Afterpay Merchant Account
Apply at afterpay.com/en-US/business (or clearpay.co.uk for the UK). You’ll need your business details, website URL, and bank account information. Approval typically takes 2–5 business days.
Step 2: Install the Plugin
- Afterpay is available as a feature within the Stripe plugin if you use Stripe — enable it under Stripe > Payment Methods.
- Alternatively, search for “Afterpay Gateway for WooCommerce” in the plugin directory for a dedicated integration.
Step 3: Configure Afterpay
- Enter your Merchant ID and Secret Key provided during onboarding.
- Set your minimum and maximum order amounts — Afterpay has eligibility thresholds, typically between $1 and $2,000 depending on your region.
- Enable Afterpay messaging on product pages to inform customers they can pay in installments.
How to Enable Apple Pay in WooCommerce
Apple Pay allows customers using Safari on iPhone, iPad, or Mac to pay with Face ID or Touch ID — a one-tap checkout experience that drastically reduces friction, especially on mobile.
In WooCommerce, Apple Pay is most commonly enabled through the Stripe plugin. If you’ve already connected Stripe, here’s how to activate Apple Pay specifically:
Step 1: Enable Payment Request Buttons in Stripe
- Go to WooCommerce > Settings > Payments > Stripe.
- Click the Payment Request Buttons tab.
- Toggle Enable Payment Request Buttons to on.
- Choose where the button appears — product page, cart, or checkout.
- Customize the button style (black, white, or outlined) and button type (Buy, Pay, Donate, etc.).
Step 2: Verify Your Domain with Apple
Apple Pay requires domain verification to work. The Stripe plugin handles this automatically on most WooCommerce setups. However, if it doesn’t:
- Log in to your Stripe Dashboard.
- Go to Settings > Payment Methods > Apple Pay.
- Add your domain and download the verification file.
- Upload the file to your server at the path:
/.well-known/apple-developer-merchantid-domain-association
Once verified, Apple Pay appears automatically for eligible Apple device users when they visit your product pages or checkout.
How to Enable Google Pay in WooCommerce
Google Pay works across Chrome and Android devices, allowing customers to pay using their saved Google payment methods without entering card details. Like Apple Pay, it’s enabled through Stripe’s Payment Request Buttons on most WooCommerce stores.
Step 1: Ensure Stripe is Connected
Google Pay is available automatically once you’ve connected Stripe and enabled Payment Request Buttons (see Apple Pay section above). Google Pay does not require domain verification.
Step 2: Verify Google Pay Eligibility
Google Pay appears automatically at checkout for customers who:
- Are using Google Chrome or an Android device.
- Have a saved payment method in their Google account.
- Are browsing a site served over HTTPS.
No additional configuration is needed beyond enabling Stripe’s Payment Request Buttons.
Alternative: PayPal’s Google Pay Integration
If you use the WooCommerce PayPal Payments plugin, Google Pay can also be enabled through PayPal’s Smart Buttons in supported regions. Enable it under your PayPal plugin settings under Smart Payment Buttons.
How to Set Up Direct Bank Transfer (BACS) in WooCommerce
Direct Bank Transfer (also called BACS — Bankers’ Automated Clearing Services) is WooCommerce’s built-in option for accepting payments via bank wire transfer. It’s a simple, no-fee option suitable for B2B sales, high-value orders, or customers who prefer not to use card payments.
Step 1: Enable BACS
- Go to WooCommerce > Settings > Payments.
- Find Direct Bank Transfer and click Manage.
- Toggle it to Enabled.
Step 2: Enter Your Bank Account Details
Fill in the following fields:
- Account Name — Your name or business name.
- Account Number — Your bank account number.
- Sort Code / Routing Number — Depending on your country.
- IBAN — Required for international bank transfers in Europe.
- BIC/Swift — Required for international transfers.
- Bank Name — Your bank’s name.
Step 3: Add Instructions
Use the Instructions field to tell customers what to do after placing their order — for example: “Please transfer the total amount to the account above and use your order number as the payment reference. Your order will be processed once payment is confirmed.”
Important note: Bank transfer orders in WooCommerce are set to “On Hold” by default until you manually mark them as paid after receiving the funds. You’ll need to do this through WooCommerce > Orders.
How to Set Up Cheque Payments in WooCommerce
WooCommerce includes a Cheque payment option as a built-in gateway. While it’s rarely used for typical consumer ecommerce, it can be useful for certain B2B businesses or markets where cheque payments are still common.
Setup Steps
- Go to WooCommerce > Settings > Payments.
- Find Check Payments and click Manage.
- Enable it and fill in your mailing address so customers know where to send the cheque.
- Add instructions explaining the cheque should be made payable to your business name.
Like bank transfers, cheque orders sit in “On Hold” status until you manually update them once the cheque clears.
How to Set Up Cash on Delivery in WooCommerce
Cash on Delivery (COD) allows customers to pay in cash when their order is delivered. It’s a common payment option in many countries, particularly in South Asia, the Middle East, and parts of Eastern Europe where digital payment adoption is still growing.
Setup Steps
- Go to WooCommerce > Settings > Payments.
- Click Manage next to Cash on Delivery.
- Enable it.
- Configure the following:
- Title — What customers see at checkout (e.g., “Cash on Delivery”).
- Description — A brief explanation for customers.
- Instructions — What happens after they place the order.
- Enable for Shipping Methods — Restrict COD to specific shipping methods if needed (e.g., only for local delivery, not standard post).
- Accept for Virtual Orders — By default, COD is disabled for virtual or downloadable products. Leave this off unless your products are physically delivered.
How to Accept Cryptocurrency Payments in WooCommerce
Accepting cryptocurrency payments is increasingly common for online stores, particularly those with a tech-savvy customer base or that operate internationally and want to avoid currency conversion fees.
Popular Crypto Payment Plugins for WooCommerce
NOWPayments — Supports Bitcoin, Ethereum, Litecoin, USDT, and 150+ other cryptocurrencies. Install from the WordPress plugin directory by searching “NOWPayments.” Create a free account at nowpayments.io, get your API key, and enter it into the plugin settings.
Coinbase Commerce — The crypto payment solution from Coinbase. Install the “Coinbase Commerce” plugin, create a merchant account at commerce.coinbase.com, generate an API key, and paste it into WooCommerce settings.
BitPay — Another established crypto processor. Install from the plugin directory, sign up at bitpay.com, and connect using the provided credentials.
Important Considerations for Crypto Payments
- Cryptocurrency prices are volatile. Most processors offer the option to convert payments instantly to your local currency to avoid price fluctuation risk.
- Refunding cryptocurrency payments requires agreeing on a rate at the time of refund, which can be complicated. Make sure your refund policy addresses this clearly.
- Tax treatment of crypto payments varies significantly by country — consult a tax professional before enabling crypto payments.
How to Connect Razorpay to WooCommerce
Razorpay is the leading payment gateway in India, supporting all major Indian payment methods including credit and debit cards, UPI, net banking, wallets like Paytm and PhonePe, and EMI options.
Step 1: Create a Razorpay Account
Sign up at razorpay.com and complete business verification. You’ll need your GST number, business PAN, and bank account details.
Step 2: Install the Plugin
- Go to Plugins > Add New and search for “Razorpay for WooCommerce”.
- Install and activate the official plugin.
Step 3: Enter API Credentials
- Log in to your Razorpay Dashboard and go to Settings > API Keys.
- Generate your test and live API keys.
- In WooCommerce, go to WooCommerce > Settings > Payments > Razorpay.
- Enter your Key ID and Key Secret.
- Enable test mode for testing, then switch to live keys when ready.
How to Connect Mollie to WooCommerce
Mollie is the most popular payment gateway in the Netherlands and is widely used across Europe. It supports iDEAL (Netherlands), Bancontact (Belgium), SEPA Direct Debit, credit cards, PayPal, Klarna, and many other regional European payment methods — all from a single integration.
Step 1: Create a Mollie Account
Sign up at mollie.com. Mollie offers easy onboarding with fast verification, often completing within minutes for businesses in supported European countries.
Step 2: Install the Plugin
- Search for “Mollie Payments for WooCommerce” in the WordPress plugin directory.
- Install and activate it.
Step 3: Connect Using API Key
- Log in to your Mollie Dashboard.
- Go to Developers > API keys and copy your Live API key (and Test API key for testing).
- In WooCommerce, go to WooCommerce > Settings > Payments > Mollie and enter the API key.
Step 4: Enable Individual Payment Methods
Mollie’s plugin adds each payment method as a separate gateway in WooCommerce. You can enable or disable individual methods (iDEAL, credit card, Bancontact, SEPA, etc.) from the Payments settings page and configure each one independently.
How to Connect Worldpay to WooCommerce
Worldpay (now part of FIS) is one of the UK’s most established payment processors, widely used by British businesses and those with a significant UK customer base.
Step 1: Apply for a Worldpay Account
Visit worldpay.com and apply for a business account. Unlike some gateways, Worldpay typically requires a separate merchant account, which may involve a credit check.
Step 2: Install the Plugin
Search for “Worldpay for WooCommerce” in the plugin directory. There are both official and third-party plugins available. Use the most recent one with strong ratings and recent updates.
Step 3: Enter Your Credentials
- From your Worldpay merchant portal, retrieve your Installation ID and Merchant Code.
- Enter these in the plugin’s settings page within WooCommerce.
- Enable test mode and perform test transactions using Worldpay’s test card numbers before going live.
How to Connect 2Checkout / Verifone to WooCommerce
2Checkout (rebranded as Verifone) is a globally available payment platform that supports 45+ payment methods and 87 currencies — making it a strong option for stores with diverse international audiences.
Step 1: Create a Verifone Account
Sign up at verifone.com. Verifone accepts merchants from many countries that larger gateways like Stripe don’t support, which makes it valuable for businesses in less-covered markets.
Step 2: Install the Plugin
Search for “2Checkout” or “Verifone” in the WordPress plugin directory. Install and activate a compatible plugin.
Step 3: Enter API Credentials
- In your Verifone merchant dashboard, navigate to Account > Merchant Settings > API.
- Copy your Account Number, Secret Key, and any other required credentials.
- Enter these into the plugin settings in WooCommerce.
- Test in sandbox mode before switching to live.
Configuring the Order of Payment Methods at Checkout
The order in which payment methods appear at your checkout page affects which one customers see and select first. Generally, you want your primary, most-used payment method at the top.
To change the order:
- Go to WooCommerce > Settings > Payments.
- You’ll see all your enabled payment gateways listed.
- Click and drag the rows by the handle on the left side to reorder them.
- Save changes.
A common recommended order for most stores:
- Stripe (Credit/Debit Cards) — most familiar to the broadest range of customers.
- PayPal — trusted by customers who prefer not to enter card details.
- Apple Pay / Google Pay — shown via Stripe’s Payment Request Buttons.
- Buy Now Pay Later (Klarna or Afterpay) — for installment payment options.
- Bank Transfer — for B2B or high-value orders.
Avoid enabling too many payment methods. Too many choices can cause decision fatigue and actually reduce conversions. Aim for 3–5 well-chosen options that cover the majority of your customers’ preferences.
Testing All Payment Methods Before Going Live
Before your store accepts real customer payments, every payment method you’ve enabled should be tested thoroughly. Discovering a broken checkout after you’ve launched is far more costly than catching it beforehand.
How to Test Each Gateway
Each major gateway provides a sandbox or test mode. Here is the process for each:
- Stripe: Enable Test Mode in settings. Use test card 4242 4242 4242 4242 with any future expiry and any 3-digit CVC.
- PayPal: Enable Sandbox mode. Use test buyer and seller accounts created in the PayPal Developer Dashboard.
- Square: Enable Sandbox mode. Use Square’s test card numbers from their developer documentation.
- Klarna: Use Klarna’s test credentials and test identities provided during onboarding.
- Razorpay: Enable test mode and use Razorpay’s test card numbers from their documentation.
- Bank Transfer / Cash on Delivery: Place a test order and verify it appears correctly in WooCommerce with the right order status.
What to Check During Testing
- Does the payment method appear correctly at checkout?
- Does a successful payment update the order status in WooCommerce?
- Does the customer receive an order confirmation email?
- Does a declined card show a clear error message to the customer?
- Do refunds process correctly back to the test payment method?
- Does the checkout work on both desktop and mobile?
Run at least two transactions per gateway: one successful and one declined. Document any issues and resolve them before switching to live mode.
SSL Certificates and PCI Compliance for WooCommerce
Every WooCommerce store that accepts card payments must meet two baseline security requirements: SSL and PCI compliance.
SSL Certificate
Your WooCommerce store must run entirely on HTTPS — not just the checkout page, but the whole site. This is a requirement of all major payment gateways. Most reputable hosting providers offer free SSL certificates through Let’s Encrypt.
To force HTTPS in WordPress:
- Go to Settings > General and update both WordPress Address and Site Address to start with
https://. - Install a plugin like Really Simple SSL to automatically redirect all HTTP traffic to HTTPS.
PCI Compliance
PCI DSS (Payment Card Industry Data Security Standard) compliance is required for any business that processes card payments. Using WooCommerce with a reputable hosted gateway (Stripe, PayPal, Square, etc.) significantly reduces your compliance scope because card data never passes through your server.
Your compliance level depends on how you collect payments:
- SAQ A — If all card data is collected by the gateway’s hosted form (Stripe Checkout, PayPal redirect, etc.). This is the simplest and most common level for WooCommerce stores.
- SAQ A-EP — If you use embedded payment fields (like Stripe Elements) on your own checkout page.
- SAQ D — Only required if you store, transmit, or process raw card data on your own server. This should never apply to a properly configured WooCommerce store.
For most WooCommerce stores using Stripe, PayPal, or similar, you qualify for SAQ A — the simplest level. Complete your annual SAQ through your payment processor or at pcisecuritystandards.org.
Payment Security Best Practices for WooCommerce
Payment security is a shared responsibility. Here’s what you need to do on the WooCommerce side to keep your store and your customers protected.
- Keep WordPress, WooCommerce, and all plugins updated. The majority of WordPress security breaches exploit outdated plugins. Enable auto-updates for security releases.
- Use a reputable WordPress hosting provider with server-level malware scanning and firewalls.
- Install a WordPress security plugin such as Wordfence or Sucuri. These provide firewalls, malware scanning, and brute force protection.
- Never store sensitive customer card data on your server. All your gateways should tokenize payment data — meaning the card details go directly to the gateway, never your database.
- Use strong, unique passwords for all admin accounts and enable two-factor authentication on WordPress and on each payment gateway dashboard.
- Limit admin user access. Only give team members the access level they actually need.
- Monitor for unusual order patterns — multiple orders from the same IP, very small test orders followed by large purchases, and orders with mismatched billing and shipping addresses are common signs of fraud.
- Enable address verification (AVS) and CVV checks in your gateway settings to reduce fraudulent card transactions.
- Set up Stripe Radar or equivalent fraud tools in your gateway to automate suspicious transaction blocking.
Common WooCommerce Payment Errors and How to Fix Them
Error: “Sorry, it seems that there are no available payment methods for your state.”
Fix: This usually means your payment gateway has been restricted by shipping zone, country, or currency. Check the gateway’s settings and ensure your store currency matches what the gateway supports. Also verify the gateway is enabled and your API keys are correct.
Error: “Your card was declined.”
Fix: This is typically a customer’s bank declining the transaction. Common reasons include insufficient funds, suspected fraud, or international transaction restrictions. Ask the customer to contact their bank or try a different card. If this is happening frequently, check your Stripe Radar or fraud settings for overly aggressive rules.
Error: “Invalid API key provided.”
Fix: You’ve entered the wrong API key, or you’re using test keys in live mode (or vice versa). Return to the gateway’s settings and paste the keys again carefully. Ensure there are no trailing spaces.
Error: Checkout page shows a blank white screen or crashes.
Fix: This is typically a PHP error caused by a plugin conflict. Temporarily deactivate other plugins one by one to identify the conflict. Enable WordPress debug mode (WP_DEBUG) to see specific error messages. Also ensure your PHP version meets WooCommerce’s requirements (PHP 7.4+ recommended).
Error: Orders show as “Pending Payment” even after successful payment.
Fix: This is almost always a webhook or IPN (Instant Payment Notification) issue. The payment gateway couldn’t notify your WooCommerce store that the payment succeeded. Check your gateway’s webhook settings and ensure the endpoint URL is accessible. For PayPal, verify your IPN URL is set correctly in your PayPal account settings.
Error: “WooCommerce is not configured to handle payment in this currency.”
Fix: The currency set in your WooCommerce General settings doesn’t match what your gateway supports. Either change your store currency to one supported by the gateway, or configure the gateway’s currency settings to match.
Error: PayPal sandbox orders not updating in WooCommerce.
Fix: PayPal’s sandbox IPN notifications sometimes fail to reach local development environments. Use a service like ngrok to expose your local site to the internet, or test on a live staging server instead of localhost.
Troubleshooting Guide for WooCommerce Payments
Work through this checklist whenever you encounter a payment issue that doesn’t have an obvious cause.
- Check if your site has SSL. All payment gateways require HTTPS. Confirm your site shows a padlock in the browser address bar.
- Confirm API keys are correct. No extra spaces, correct mode (test vs live), correct gateway.
- Clear all caches. Clear your WordPress cache plugin, browser cache, and any CDN cache. Stale cache files are a surprisingly common cause of payment issues.
- Check for plugin conflicts. Deactivate all non-essential plugins and test checkout. Reactivate one by one to identify the culprit.
- Switch to a default WordPress theme temporarily. A theme conflict can sometimes break checkout JavaScript.
- Review WooCommerce Status logs. Go to WooCommerce > Status > Logs and look for entries from your payment gateway. Error messages here are usually specific and actionable.
- Check your gateway’s dashboard logs. Stripe’s Developers > Logs, PayPal’s Transaction History, etc. — each gateway records attempted transactions with detailed error codes.
- Test in an incognito window. Rules out browser extension interference.
- Test on a different device or network. Some payment issues are device or ISP specific.
- Verify webhook URLs. Each gateway should have your store’s webhook URL configured. It should be your live site URL, not localhost.
If you’ve exhausted these steps, contact your gateway’s support team with the specific error message and your gateway’s transaction logs. Most support teams respond within a few hours and can identify issues quickly.
Best Payment Method Combinations for Different Store Types
Not every store needs the same payment methods. Here are recommended combinations based on store type.
General Ecommerce Store (Fashion, Home, Gifts)
- Stripe (Credit/Debit Cards + Apple Pay + Google Pay)
- PayPal
- Klarna or Afterpay (Buy Now Pay Later)
Digital Products / Downloads / Software
- Stripe
- PayPal
- Credit cards via Authorize.Net (for US customers requiring detailed receipts)
B2B / Wholesale Store
- Stripe
- Direct Bank Transfer (BACS)
- Authorize.Net (for invoice-based purchasing)
International Store with Global Audience
- Stripe (global card support)
- PayPal (recognized worldwide)
- Mollie (for European regional methods)
- Razorpay (for Indian customers)
- 2Checkout/Verifone (for less-covered markets)
Subscription / Membership Store
- Stripe (excellent recurring billing support)
- PayPal (supports subscriptions in many countries)
- Direct Bank Transfer (for annual subscriptions)
Local Delivery / Food / Services
- Stripe
- Cash on Delivery
- PayPal
How the Right Payment Methods Increase Conversions
Payment method selection is a conversion optimization tool, not just a technical requirement. Here’s how to use it strategically.
Reduce friction at mobile checkout. Apple Pay and Google Pay eliminate card entry entirely for mobile users. Enabling these can increase mobile conversion rates by 20–40% on eligible traffic.
Increase average order value with BNPL. Klarna and Afterpay consistently show that offering installment payments increases average order value. Customers who would hesitate at a $200 purchase are more likely to buy when they see “4 payments of $50” at checkout.
Capture hesitant buyers with PayPal. A segment of your visitors will never enter their card details on an unfamiliar site. PayPal acts as a trust bridge for these customers.
Match payment methods to your audience demographics. Younger shoppers prefer BNPL and digital wallets. Older customers often prefer traditional card payment or PayPal. International customers may rely on regional methods. Knowing your audience helps you prioritize the right options.
Display accepted payment logos at checkout. Showing the logos of accepted payment methods (Visa, Mastercard, PayPal, Apple Pay, etc.) near the checkout area reduces anxiety and increases confidence. WooCommerce themes often support this natively, or you can add a logo strip manually.
Accepting International Payments in WooCommerce
Selling internationally requires more than just enabling a payment gateway. You need to think about currencies, regional payment methods, and tax implications.
Multi-Currency Support
WooCommerce doesn’t support multiple currencies natively (without extensions). To offer prices in multiple currencies, install a plugin like WooCommerce Currency Switcher or use a gateway like Stripe that handles currency conversion automatically on their end.
Regional Payment Methods
Major card payments (Visa, Mastercard) are universal, but certain markets have dominant local payment preferences:
- Netherlands: iDEAL (via Mollie)
- Germany: SOFORT, SEPA Direct Debit (via Mollie or Stripe)
- Belgium: Bancontact (via Mollie)
- India: UPI, Net Banking (via Razorpay)
- Brazil: Boleto Bancário (via specific Brazilian gateways)
- China: Alipay, WeChat Pay (via Stripe in supported regions)
Currency and Tax Considerations
- Configure your WooCommerce tax settings to handle VAT, GST, or sales tax correctly for international orders.
- Consider Stripe Tax or a plugin like TaxJar for automated international tax calculation.
- Be aware of currency conversion fees charged by your gateway — these can add up for high-volume international sales.
Managing Refunds Across Payment Gateways
Refund processing in WooCommerce can be done directly from the Orders screen, and for most gateways, WooCommerce will automatically initiate the refund through the gateway.
How to Issue a Refund in WooCommerce
- Go to WooCommerce > Orders and open the relevant order.
- Scroll down to the Order Items section and click Refund.
- Enter the quantity and/or amount to refund (full or partial).
- Check Refund via [Gateway Name] to process the refund automatically through the payment gateway.
- Click Refund [Amount] to confirm.
The refund is sent to the original payment method. Processing times vary:
- Stripe: 5–10 business days to the customer’s card.
- PayPal: Instant for PayPal balance; 3–5 business days for card refunds.
- Bank Transfer / COD: Manual process — you’ll need to initiate this outside of WooCommerce.
Note: Stripe and most gateways do not refund the original processing fee when you issue a refund. Factor this into your refund policy considerations.
Managing Disputes and Chargebacks
A chargeback occurs when a customer contacts their bank to reverse a transaction. WooCommerce doesn’t handle disputes directly — they’re managed through your payment gateway’s dashboard.
Preventing Disputes
- Use a clear, recognizable statement descriptor (set in your gateway settings) so customers recognize the charge on their bank statement.
- Send order confirmation emails promptly.
- Provide tracking information for physical shipments.
- Maintain responsive customer service — most disputes can be resolved before a chargeback is filed if the customer can reach you.
- Write a clear refund policy that’s easily accessible on your website.
Responding to Disputes
- You’ll receive an email from your gateway when a dispute is filed.
- Log in to your gateway dashboard (Stripe, PayPal, etc.) and navigate to the Disputes section.
- Gather evidence: order confirmation, customer communication, shipping tracking, proof of delivery.
- Submit your evidence before the deadline shown in the dashboard.
Respond to every dispute, even ones that seem unfair. Gateways base their decisions on the evidence submitted, and a well-documented response significantly improves your chances of winning.
Mistakes to Avoid When Setting Up WooCommerce Payments
After helping many store owners set up their WooCommerce payment systems, these are the most common and costly mistakes to watch for.
- Going live without testing. Always test every payment method in sandbox mode before taking real payments. A broken checkout costs you sales and damages customer trust.
- Enabling too many payment methods. More isn’t always better. Too many choices at checkout cause confusion. Stick to 3–5 well-chosen options.
- Using live API keys in test mode by accident. Or vice versa — using test keys in live mode. Double-check which mode your settings are in before going live.
- Not verifying webhooks. Without correct webhook configuration, your store won’t receive real-time payment confirmations. Orders stay in “Pending” and you never know when you’ve been paid.
- Skipping SSL setup. Payment gateways won’t work on an HTTP site, and customers won’t trust one.
- Not completing gateway account verification. Many gateways (Stripe, PayPal, Square) will hold or limit your payouts until identity and business verification is complete. Do this before launch.
- Ignoring mobile checkout. Test every payment method on an actual mobile device. Mobile-specific issues like overlapping buttons or Apple Pay not appearing are common and easy to miss on desktop.
- Forgetting to set up receipt emails. Customers expect an email confirmation after payment. Ensure WooCommerce’s order confirmation emails are enabled and that your payment gateway’s receipt emails don’t conflict.
- Not updating plugins regularly. Outdated payment plugins are a security risk and may stop working when gateways update their APIs.
Frequently Asked Questions About WooCommerce Payment Methods
1. How many payment methods can I add to WooCommerce?
There’s no hard limit. WooCommerce supports an unlimited number of payment gateways. However, for practical conversion reasons, most stores benefit most from 3–5 well-chosen options rather than an overwhelming list.
2. Do I need to pay for payment gateway plugins?
Many of the most popular plugins — including Stripe, PayPal, Square, and Klarna — offer free official plugins. You pay transaction fees to the gateway, not upfront plugin costs. Some premium plugins with additional features are available for purchase, but for most stores the free versions are sufficient.
3. Which payment gateway has the lowest fees for WooCommerce?
This depends on your transaction volume, country, and payment types. Stripe and Square both charge 2.9% + $0.30 per transaction (US rates). PayPal charges similar rates. For high-volume stores, all three offer custom pricing. Always compare the full fee structure including international fees and currency conversion charges for your specific business situation.
4. Can I accept payments in multiple currencies in WooCommerce?
WooCommerce itself only supports one currency natively. For multi-currency support, use a plugin like WooCommerce Currency Switcher or Currency Converter Widget. Stripe also handles currency conversion automatically on their end, showing customers their local currency equivalent during checkout.
5. Is it safe to store customer card details in WooCommerce?
You should never store raw card details in WooCommerce or on your server. Reputable gateways like Stripe and PayPal tokenize card data — they store a reference token, not the actual card numbers. This is why using established gateways rather than building custom payment handling is critical.
6. Why are my WooCommerce orders showing as “Pending Payment” after customers pay?
This is almost always a webhook or IPN issue. The gateway paid successfully but couldn’t notify your WooCommerce store. Check your gateway’s webhook settings and make sure the callback URL points to your live domain, not a test or localhost environment.
7. Can I use Stripe and PayPal at the same time in WooCommerce?
Yes, absolutely. Many stores offer both. Stripe handles card payments and digital wallets, while PayPal provides an alternative for customers who prefer it. Having both active simultaneously is a best practice for maximizing checkout coverage.
8. Do I need WooCommerce Subscriptions to accept recurring payments?
For subscription billing, WooCommerce Subscriptions (a premium WooCommerce extension) is generally required unless you use a gateway with native subscription support. Stripe Billing, for example, can handle recurring payments via its own subscription infrastructure which integrates with WooCommerce.
9. How do I test payments without charging real cards?
All major gateways provide a sandbox or test mode. Enable test mode in each gateway’s settings and use the test card numbers provided in that gateway’s documentation to simulate successful and failed transactions.
10. What happens if a customer’s payment is successful but the order doesn’t show in WooCommerce?
This is a webhook synchronization issue. Check your gateway’s event logs for failed webhook delivery attempts. Verify your webhook URL is correct in the gateway dashboard and that your server returned a 200 response to the webhook.
11. Can I offer Buy Now Pay Later through WooCommerce?
Yes. Klarna, Afterpay/Clearpay, and PayPal Pay Later all have WooCommerce integrations. These are especially effective for higher-priced products where spreading payments removes the price barrier for customers.
12. Is WooCommerce PCI compliant?
WooCommerce itself is not a payment processor, so it doesn’t hold PCI compliance certification. However, using WooCommerce with a reputable hosted gateway like Stripe or PayPal means card data never touches your server, qualifying you for the simplest PCI compliance level (SAQ A).
13. Why isn’t Apple Pay showing at my WooCommerce checkout?
Apple Pay only appears for customers using Safari on Apple devices with a saved payment method. It also requires domain verification. Check that your Stripe Payment Request Buttons are enabled and that your domain has been verified with Apple through your Stripe Dashboard.
14. Can WooCommerce handle international tax automatically?
WooCommerce has basic tax settings, but for accurate international tax calculation, use Stripe Tax, TaxJar, or Avalara integrated with WooCommerce. These automatically calculate VAT, GST, and sales tax based on the customer’s location.
15. What’s the difference between a payment gateway and a merchant account?
A merchant account is a type of bank account that holds funds from card transactions before they’re transferred to your business bank account. A payment gateway is the software that authorizes and processes transactions. Many modern gateways like Stripe and Square include a merchant account as part of their service, so you don’t need to set one up separately.
16. How do I add payment method logos to my WooCommerce checkout page?
Most WooCommerce themes display payment method logos automatically using the icons registered by each gateway plugin. If your theme doesn’t, use a plugin like Payment Icons for WooCommerce or add them manually using a custom HTML widget or theme modification.
17. Can I restrict certain payment methods to specific products or categories?
Not natively in WooCommerce, but premium plugins like WooCommerce Payment Gateway Based Fees and Discounts or WooCommerce Conditional Payments allow you to show or hide specific payment methods based on product type, cart contents, or shipping method.
18. What should I do if a payment gateway plugin conflicts with my WooCommerce theme?
Temporarily switch to a default WordPress theme (like Storefront or Twenty Twenty-Four) to confirm if the theme is causing the issue. If the conflict is confirmed, check the plugin’s support documentation for theme compatibility notes, or contact the plugin developer with your theme’s name and version.
19. How long does it take to receive payouts from WooCommerce payment gateways?
Payout timing varies by gateway: Stripe typically pays out in 2 business days (US); PayPal is often instant to your PayPal balance (then 1–3 days to your bank); Square pays out next business day in the US. All gateways may have longer payout windows for new accounts until transaction history is established.
20. Do I need a separate payment gateway for each country I sell to?
Not necessarily. Gateways like Stripe, PayPal, and 2Checkout/Verifone accept payments from customers in most countries through a single integration. You only need additional regional gateways if you want to support specific local payment methods (iDEAL, UPI, etc.) that these global gateways don’t cover.
Conclusion
Setting up payment methods in WooCommerce is one of the most impactful things you can do for your online store. Every payment method you add correctly is a potential sale that would otherwise be lost to checkout abandonment. Every broken or missing payment option is revenue walking out the door.
The good news is that WooCommerce’s payment ecosystem is mature, well-documented, and largely accessible even without technical expertise. Whether you’re adding Stripe for global card payments, PayPal for customer trust, Klarna for higher average order values, or regional gateways like Razorpay and Mollie to reach specific markets — the process follows the same basic pattern: install the plugin, connect your account, configure your settings, test thoroughly, and go live.
To recap the key principles from this guide:
- Always ensure SSL is active before setting up any payment gateway.
- Test every payment method in sandbox mode before going live.
- Keep your plugins updated to maintain security and compatibility.
- Choose 3–5 payment methods that cover your core customer base rather than enabling every option available.
- Configure webhooks correctly so your store receives real-time payment confirmations.
- Set up clear statement descriptors to reduce disputes.
- Monitor your gateway dashboards regularly for failed payments, disputes, and unusual activity.
Take the time to do this right, and your WooCommerce payment setup will become a reliable foundation for your business — one that serves customers well, processes payments securely, and grows with you as your store scales.
Need Professional Website Design or Payment Gateway Setup?
At 5sixDigital, we help businesses create professional websites and integrate secure payment solutions for customers worldwide.
Website: https://5sixdigital.com
Email: info@5sixdigital.com
Whether you need a new WooCommerce store, payment gateway setup, Stripe integration, or help growing your online business, our team is ready to assist.
Contact us today to get started.